- These list items are microformat entries and are hidden from view.
- https://dltj.org/article/embedding-graphics-in-jaspersoft-report-files/
- One of the features of Jaspersoft Reports is the ability to include static graphics – logos, for instance – in the completed reports. These graphic files are normally listed in the JRXML configuration file by reference – meaning that what is stored in the configuration is a file name and not the graphic itself. Most times the configuration file and the ancillary graphics files are uploaded to a JasperReports Server for execution. In the environment that I’m working in, CollectionSpace, the report generator is embedded in the application without the JasperReports Server endpoint. The JRXML files must be compiled into the application, which makes keeping track of the ancillary graphics files somewhat troublesome.Ideally, I would like to embed the graphics into the JRXML file itself, similar to what is done in with the data URI schema in HTML and CSS files to reduce the connection latency between client and server. This is possible, but the instructions and hints you find out on the internet to do it are out of date or incomplete. The instructions below are correct for Jaspersoft Studio version 6.2.0.Step 1: Encode your image in base64Base64 is a way to take a binary file and encode it into ASCII characters. XML files have limits on what they can contain, so encoding the binary image file in base64 provides a way to embed the image data into XML while still honoring the ASCII nature of XML. There are many ways to do the encoding; I use the Base64 Image Encoder site. What you will get back is a string of data that starts like this:data:image/jpeg;base64,/9j/4AAQSkZJRgABAQEAY...This is a DATA URI, and it contains details at the start that are not part of the image data itself. Everything up to and including the comma – data:image/jpeg;base64, – needs to be removed. The remainder of the string is the base64-encoded image data.Step 2: Put the base64 image data into a report variable In the Outline, right click on Variables to create a variable. To put the image data into the JRXML file, we will create a variable in the report. Right click (or control click) on the “Variables” heading in the Outline view, and select “Create Variable”. Give the variable a name and paste the image data into the Expressions field in quotes. Give the variable a name and paste the image data into the Expressions field surrounded by double quotes. Leave all of the other values the same (Value Class Name is java.lang.String, no calculation function or increment type, reset type is Report, and no data in Initial Value Expression or Incrementer Factory Class Name).Step 3: Add image to the report Select "Custom expression" and paste Java snippet. Click and drag an image element from the Palette onto the report. A “Create new image element” dialog box pops up with several choices for “Image creation mode”, including a workspace resource, an absolute path, or a URL. Pick the last choice, “Custom expression”, and enter this snippet of Java below. There is a place in the snippet where the variable with the base64-encoded image is included (CSpaceLogo in this case); replace this with the variable name from the previous step.new ByteArrayInputStream(Base64.decodeBase64($V{CSpaceLogo}.getBytes()))Step 4: Add Base64 class import to the reportOne final step…in order to use the Base64.decodeBase64 function when the report is run, we need to explicitly import that class when the report is run. In the report editor there are tabs for “Design”, “Source”, and “Preview”. Click on “Source” to see the raw JRXML. Below the last line that starts with <property name="</code"> and above the <querystring> line, add this line:<import value="org.apache.commons.codec.binary.Base64"></import>All done! Save and preview your report, and you’ll see the image included in the report.
- 2015-12-30T17:27:54+00:00
- 2019-01-01T02:13:40+00:00
Embedding Graphics in Jaspersoft Report Files
One of the features of Jaspersoft Reports is the ability to include static graphics – logos, for instance – in the completed reports. These graphic files are normally listed in the JRXML configuration file by reference – meaning that what is stored in the configuration is a file name and not the graphic itself. Most times the configuration file and the ancillary graphics files are uploaded to a JasperReports Server for execution. In the environment that I’m working in, CollectionSpace, the report generator is embedded in the application without the JasperReports Server endpoint. The JRXML files must be compiled into the application, which makes keeping track of the ancillary graphics files somewhat troublesome.
Ideally, I would like to embed the graphics into the JRXML file itself, similar to what is done in with the data URI schema in HTML and CSS files to reduce the connection latency between client and server. This is possible, but the instructions and hints you find out on the internet to do it are out of date or incomplete. The instructions below are correct for Jaspersoft Studio version 6.2.0.
Step 1: Encode your image in base64
Base64 is a way to take a binary file and encode it into ASCII characters. XML files have limits on what they can contain, so encoding the binary image file in base64 provides a way to embed the image data into XML while still honoring the ASCII nature of XML. There are many ways to do the encoding; I use the Base64 Image Encoder site. What you will get back is a string of data that starts like this:
data:image/jpeg;base64,/9j/4AAQSkZJRgABAQEAY...This is a DATA URI, and it contains details at the start that are not part of the image data itself. Everything up to and including the comma – data:image/jpeg;base64, – needs to be removed. The remainder of the string is the base64-encoded image data.
Step 2: Put the base64 image data into a report variable
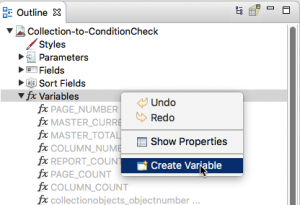
To put the image data into the JRXML file, we will create a variable in the report. Right click (or control click) on the “Variables” heading in the Outline view, and select “Create Variable”.
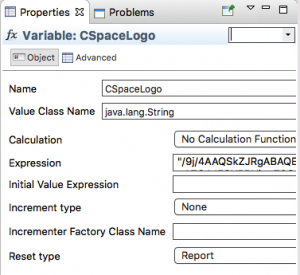
Give the variable a name and paste the image data into the Expressions field surrounded by double quotes. Leave all of the other values the same (Value Class Name is java.lang.String, no calculation function or increment type, reset type is Report, and no data in Initial Value Expression or Incrementer Factory Class Name).
Step 3: Add image to the report
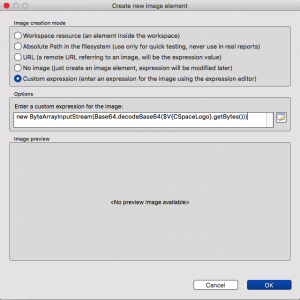
Click and drag an image element from the Palette onto the report. A “Create new image element” dialog box pops up with several choices for “Image creation mode”, including a workspace resource, an absolute path, or a URL. Pick the last choice, “Custom expression”, and enter this snippet of Java below. There is a place in the snippet where the variable with the base64-encoded image is included (CSpaceLogo in this case); replace this with the variable name from the previous step.
new ByteArrayInputStream(Base64.decodeBase64($V{CSpaceLogo}.getBytes()))Step 4: Add Base64 class import to the report
One final step…in order to use the Base64.decodeBase64 function when the report is run, we need to explicitly import that class when the report is run. In the report editor there are tabs for “Design”, “Source”, and “Preview”. Click on “Source” to see the raw JRXML. Below the last line that starts with <property name="</code"> and above the <querystring> line, add this line:
<import value="org.apache.commons.codec.binary.Base64"></import>All done! Save and preview your report, and you’ll see the image included in the report.
